2024-03-15 22:35h
Englisch version here
Java-Script to convert/decode MQTT-Data in ioBroker – Jetzt auch mit Daten der Akkus / Now with Accu-Data
Benutzung (UND Steuerung!) eines Zendure Solarflow mit einem lokalen MQTT-Server
Ich bin ein Fan davon meine IOT-Geräte ohne eine Hersteller-Cloud zu nutzen und lokal zu steuern.
Das hat mehrere Gründe:
- ich bin nicht von der Cloud abhängig. Wenn die einmal ausfällt oder der Hersteller den Betireb einstellt, kann ich die Geräte trotzdem weiter betreiben
- meine Daten bleiben bei mir ;-)
- im Fall von Zendure Solaflow: ich kann meine Anlage lokal selbst steuern. Über den MQTT-Server von Zendure geht das ja nicht. Lokal schon.
Ich habe zuerst die Variante von Reinhard Brandstätter benutzt - https://github.com/reinhard-brandstaedter/solarflow-bt-manager (herzlichen Dank für deine Arbeit und die Inspiration).
Das funktioniert so weit, aber man braucht ein extra Gerät (z.B. einen Raspberry PI) um die Konfiguration des Solarflow zu verändern.
Nun wollte ich mir nicht extra eine Raspi in irgendeine Schublade legen, den ich nur hin und wieder benötige. Daher war die Überlegung, ob es nicht einen anderen Weg gibt.
Den gibt es!
Voraussetzung ist allerdings, dass man die Möglichkeit hat DNS-Anfragen entsprechend zu "manipulieren". Das ist z.B. durch die Verwendung von pihole als lokalen DNS-Server möglich. Ich nutze jedoch im Moment eine andere Lösung. Meine IOT-Geräte betreibe ich in eineem eigenen WLAN, das von einem OPENWRT-Router bereitgestellt wird. In OPENWRT kann man ebenfalls DNS-Anfragen "verbiegen".
Als nächstes benötigt man einen lokalen MQTT-Server, den man so konfigurieren muss, dass keine Anmeldung erforderlich ist. Ich bin mir bewusst, dass das ein gewisses Risiko darstellt, aber seit ich weiß, dass man sich per Blutooth ohne die Kenntnis irgendwelcher Daten wie Seriennummer, Passwort, etc mit dem Solarflow verbinden kann, wenn man nur in der Nähe ist ... Das ist eine schwerwiegendere Sicherheitslücke.
Als MQTT-Server kann z.B. Mosquitto verwendet werden (die Konfigurationsoption für die anonyme Anmeldung ist hier "allow_anonymous true"), oder ein interner irgendeiner Hausautomatisierungslösung wie zum Beispiel ioBroker. Der MQTT muss zwingend auf Port 1883 konfiguriert sein. Da am Solarflow ja nichts geändert wird, muss der Standardport verwendet werden.
Das DNS muss (zumindest in meinem Fall, ich hoffe das
gilt allgemein) nun so "verbogen" werden, dass "ec2-3-72-202-178.eu-central-1.compute.amazonaws.com"
auf die IP-Adresse des lokalen MQTT-Servers zeigt. Nach kurzer Wartetzeit (möglicherweise auch erst nach einem Neustart des
Hub) tauchen dann die ersten Nachrichten im lokalen MQTT-Server auf.
Das DNS muss nun so verbogen werden, dass „mqtteu.zen-iot.com“ auf die IP-Adresse des lokalen MQTT-Servers zeigt. Danach muss entweder der HUB neu gestartet oder kurz die WLAN-Verbindung zwischen Solarflow-Hub und Router getrennt werden. Nach kurzer Zeit tauchen dan die ersten Nachrichten im lokalen MQTT-Server auf.
Ich habe für mein Solarflow vor einiger Zeit den EU-Server ausgewählt. Daher vermute ich, dass beim globalen Server der Name vermutlich mqtt.zen-iot.com lautet. Es wäre schön, wenn das jemand bestätigen (oder widerlegen könnte).
Herzlichen Dank an Thierry Wehr, der mich darauf
aufmerksam gemacht hat, dass
ec2-3-72-202-178.eu-central-1.compute.amazonaws.com nur ein cname
Eintrag für mqtteu.zen-iot.com ist und dass eine Unterbrechung der
WLAN-Verbindung ausreichend ist.
Das sieht dann so aus (der geschwärzte Bereich ist die Seriennummer
DeviceID des eigenen Solarflow
Hubs):

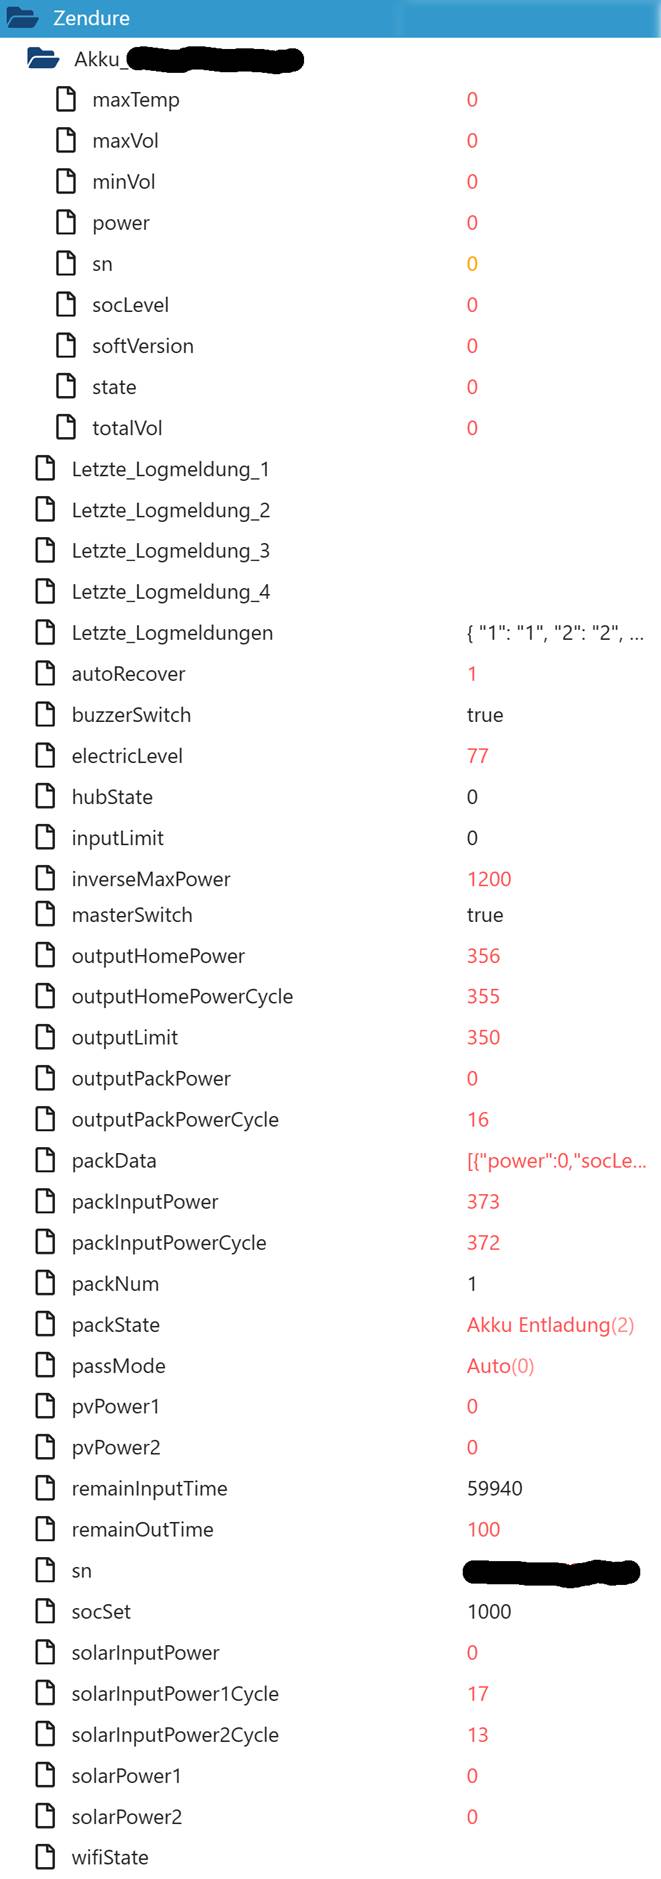
Die interessanten Daten stehen im Topic "report", allerdings leider in einer wilden Mischung
aus JSON und Array. Da muss man ein wenig Gehirnschmalz investieren um die
Werte herauszufiltern. Ich mach das im ioBroker per Javascript. Aktuell bekomme Bis heute Morgen bekam
ich die folgenden Datenpunkte. Dann habe ich das letzte Zendure-Update
gemacht…:

Leider habe ich dabei festgestellt, dass die Namen der gelieferten Datenpunkte sich nach einem Update des Zendure ändern können. Daher habe ich mein ioBroker-Script so angepasst, dass die Datenpunkte automatisch erzeugt werden, sobald ein Wert das erste Mal auftaucht.
Die Datenpunkte des Akkus sind zurzeit leer (mag aber auch sein, dass ich da noch einen Fehler habe). Thierry schrieb mir, dass bei ihm die Akku-Daten aktualisiert werden, wenn er einmal die Netzwerkverbindung des Solarflow trennt. Das ist bei mir leider nicht der Fall. Vielleicht finde ich ja noch die Ursache.
Wirklich interessant für mich sind nur die folgenden Punkte:
electricLevel = aktueller Ladestand des Akkus
socSet = untere
Ladegrenze multipliziert mit 100 (1000 = 10%)
socSet = obere Ladegrenze multipliziert mit 10 (1000 = 100%)
minSoc = untere Ladegrenze multiliziert mit 10 (100 = 10%)
outputHomePower = Leistung die gerade ins Haus abgegeben wird
packState = 0: Bypass, 1: Akku wird geladen, 2: Akku wird entladen
passMode = 0: Bypass automatisch, 1: Bypass immer aus, 2: Bypass immer ein. Mit 2 zwingt man das SF dazu ins Haus einzuspeisen.
outputLimit = hierüber kann die ans Haus auszugebende Leitung eingestellt werden
solarPower1 / solarPower2 = Leistung, welche die beiden Panels aktuell produzieren
Setzen von Werten
minSoc
outputLimit
packState
passMode
Um Werte zu setzen muss man sie ins MQTT-Topic
iot/73bkTV/<Seriennummer
DeviceID eures Hubs>/properties/write
schreiben. Dabei müssen die Werte folgendes Format haben:
{"properties": { "minSoc": 20 }}
Meine persönliche Nutzung sieht so aus:
Frühmorgens (vor Sonenaufgang) sende ich folgende Befehle:
· {"properties": { "outputLimit": 0 }}
· {"properties": { "passMode": 0 }}
Dadurch wird der Akku geladen und wenn er voll ist, geht die gesamte Leistung ins Haus.
Abends (nach Sonennunetrgang) sende ich folgende Befehle:
· {"properties": { "outputLimit": 300 }}
· {"properties": { "passMode": 0 }}
Dadurch werden 300 Watt ins Haus abgegeben bis der Akku die untere Ladegrenze erreicht.
Das ist für mich die ideale Nutzung. Ich habe abends (bzw. bei gutem Sonnenschein schon im Laufe des Vormittags) einen vollen Akku, den ich ab Sonnenuntergang nutzen kann.
Einschränkungen
· Über die Zendure App kann nur noch per Bluetooth auf das Solarflow zugegriffen werden.
· So lange die ZendureApp per Bluetooth verbunden ist, werden keine Werte per MQTT geliefert.
· Energiepläne funktionieren nicht mehr (das kann ich verschmerzen, da ich ja jetzt so steuern kann, wie ich will. Inkl. Sonnenaufgang/Sonennuntergang/bei hohen Verbräuchen/usw.)
· Erträge werden in der App nicht mehr angezeigt
Aber ich brauche die App nicht mehr wirklich. Ich nutze lieber meine Kombination aus ioBroker und Grafana und einem 7,5" ePaper-Display.
Updates
Updates können entweder per Bluetooth eingespielt werden, oder man deaktiviert vorübergehend die DNS-Umleitung (und startet die WLAN-Verbindung oder ggf. den Solarflow Hub neu).
Auch wenn ja am Solaflow-System keinerlei Änderungen vorgenommen werden übernehme ich keine Garantie das alles funktioneirt, oder dass irgendwelche Defekte am Solarflow-Hub, am Wechselrichter, in eurer Stromversorgung oder wo auch immer auftreten. Wenn ihr das probiert, dann AUF EIGENE GEFAHR!!!
Zu guter Letzt
Irgendwo habe ich gelesen, dass nach dem Umbiegen auf den eigenen MQTT-Server einmal der folgende Befehl in "iot/73bkTV/cD53g9bG/properties/read" geschrieben werden muss:
{"properties": ["getAll"]}
Ob das wirklich sein muss, weiß ich nicht. Ich habe es getan und kann daher nicht mehr nachvollziehen ob es nötig ist.
Solltet ihr Fehler in dieser Anleitung finden oder Verbesserungsvorschläge haben, dann schriebt mir gerne an andreas@hintermueller.de
Ich kann allerdings keine weitergehende Hilfe bei der Umsetzung bei euch vor Ort leisten. Aber Tutorials z.B. zum Aufsetzen von Mosquitto gibt es ja genug. Und mit ein bisschen Programmierkenntnissen im bevorzugten Homeautomatisierungssystem sollte es auch kein Problem sein an die einzelnen Datenpunkte zu kommen.
Use (AND control!) of a Zendure Solarflow with a local MQTT server
I'm a fan of using my IOT devices without a manufacturer cloud and controlling them locally.
There are several reasons for this:
- I'm not dependent on the cloud. If it fails or the manufacturer stops operating it, I can still continue to operate the devices
- My data stays with me ;-)
- in the case of Zendure Solaflow: I can control my system locally myself. This is not possible via the Zendure MQTT server. Locally it is.
I first used Reinhard Brandstätter's version - https://github.com/reinhard-brandstaedter/solarflow-bt-manager (thank you very much for your work and inspiration).
This works so far, but you need an extra device (e.g. a Raspberry PI) to change the configuration of the Solarflow.
Now I didn't want to put a Raspi in some drawer that I only need from time to time. So I wondered whether there was another way.
And there is!
However, the prerequisite is that you have the possibility to "manipulate" DNS queries accordingly. This is possible, for example, by using pihole as a local DNS server. However, I am currently using a different solution. I operate my IOT devices in my own WLAN, which is provided by an OPENWRT router. You can also "bend" DNS queries in OPENWRT.
Next, you need a local MQTT server, which you have to configure so that no login is required. I am aware that this is a bit of a risk, but since I know that you can connect to the Solarflow via Blutooth without knowing any data such as serial number, password, etc. just by being nearby ... This is a more serious security vulnerability.
Mosquitto, for example, can be used as an MQTT server (the configuration option for anonymous login is "allow_anonymous true"), or an internal home automation solution such as ioBroker. The MQTT must be configured on port 1883. Since nothing is changed on the Solarflow, the standard port must be used.
The DNS must now be "bent"
(at least in my case, I hope this applies
generally) so that "ec2-3-72-202-178.eu-central-1.compute.amazonaws.com"
points to the IP address of the local
MQTT server. After a short wait (possibly only after a restart of the hub), the
first messages will appear on the local
MQTT server.
The DNS must now be bent so that "mqtteu.zen-iot.com" points to the IP address of the local MQTT server. Then either restart the HUB or briefly disconnect the WLAN connection between the Solarflow hub and the router. After a short time, the first messages will appear in the local MQTT server.
I selected the EU server for my Solarflow some time ago. I therefore assume that the name of the global server is probably mqtt.zen-iot.com. It would be nice if someone could confirm (or disprove) this.
Many thanks to
Thierry Wehr, who pointed
out to me that ec2-3-72-202-178.eu-central-1.compute.amazonaws.com is only a cname
entry for
mqtteu.zen-iot.com and that an interruption
of the WLAN connection is sufficient.
It will look
like this (the blackened area is the serial
number DeviceID of your Solarflow
Hub):

The interesting data is in the
"report" topic,
but unfortunately in a wild mixture
of JSON and array. You have to
invest a bit of brainpower to
filter out the values. I do this in the ioBroker using
Javascript. I currently
Until this morning I get the
following data points. Then i make the last Zendure
Update…:
Unfortunately, I noticed that the names of the supplied data points can change after an update of Zendure. I have therefore adapted my io broker script so that the data points are generated automatically as soon as a value appears for the first time.
The data points of the battery are currently empty (but it may be that I still have an error there). Thierry wrote to me that his battery data is updated when he disconnects the Solarflow from the network. Unfortunately, this is not the case for me. Maybe I can still find the cause.
Only the following points are really interesting for me:
electricLevel = current charge level of the battery
socSet = Discharge limit of the battery
multilpaced with 100 (1000
= 10%)
socSet = charge limit of the battery multiplicated with 10 (1000 = 100%)
minSoc = Discharge limit of the battery multiplicated with 10 (100 = 10%)
outpputHomePower = power currently being delivered to the house
packState = 0: Bypass, 1: Battery is charging, 2: Battery is discharging
passMode = 0: Bypass automatic, 1: Bypass always off, 2: Bypass always on. With 2 you force the SF to feed into the house.
outputLimit = the power to be output to the house can be set here
solarPower1 / solarPower2 = power that the panels currently deliver
Setting values
Some of the values can be set via MQTT. I have only experimented a little so far, but it works for:
minSoc
outputLimit
packState
passMode
To set values you have to write them to the MQTT topic
iot/73bkTV/<serial
number DeviceID of your hub>/properties/write
write. The values must have the following format:
{"properties": { "minSoc": 20 }}
My personal usage looks like this:
Early in the morning (before sunrise) I send the following commands:
· {"properties": { "outputLimit": 0 }}
· {"properties": { "passMode": 0 }}
This charges the battery and when it is full, all the power goes into the house.
In the evening (after sunset) I send the following commands:
· {"properties": { "outputLimit": 300 }}
· {"properties": { "passMode": 0 }}
This will output 300 watts into the house until the battery reaches the lower charge limit.
This is the ideal use for me. I have a full battery in the evening (or during the morning if the sun is shining well), which I can use from sunset.
Restrictions
· The Solarflow can only be accessed via Bluetooth using the Zendure app.
· As long as the App is connected via Bluetooth no data will be send over MQTT
· Energy plans no longer work (I can get over this, as I can now control it as I wish. Including sunrise/sunset/when consumption is high/etc.)
· Yields are no longer displayed in the app
But I don't really need the app anymore. I prefer to use my combination of ioBroker and Grafana and a 7.5" ePaper display.
Updates
Updates can either be installed via Bluetooth or you can temporarily deactivate DNS redirection (and restart the Solarflow Hub if necessary).
Even if no changes are made to the Solaflow system, I do not guarantee that everything will work or that there will be any defects in the Solarflow Hub, the inverter, your power supply or anywhere else. If you try this, you do so AT YOUR OWN RISK!!!
At the End
I read somewhere that after switching to your own MQTT server, the following command must be written in "iot/73bkTV/cD53g9bG/properties/read":
{"properties": ["getAll"]}
I don't know if that really has to be the case. I did it and therefore can no longer understand whether it is necessary.
If you find errors in these instructions or have suggestions for improvement, please write to me at andreas@hintermüller.de
However, I cannot provide any further help with the implementation at your location. But there are plenty of tutorials for setting up Mosquitto, for example. And with a little programming knowledge in your preferred home automation system, getting to the individual data points shouldn't be a problem.